I am just going to start off by saying this is going to be one of the greatest banana puddings you’ve ever had in your life.
AND it’s one of the easiest things you’ll ever make – not even an Instant Pot is required for this one! In fact, there’s ZERO cooking involved at all!
Inspired by Magnolia Bakery’s Banana Pudding, I just slightly tweaked it so it has a cold milk mixture instead of an ice water one giving it an even fluffier, smoother end result.
When I made this for a party the other day, it went so quickly I barely got to have some myself and at least six people came up to me asking for the recipe. I would be willing to wager that the same will happen to you.
Here’s How I Made It!:

We’ll begin with some liquid caramel sweetened condensed milk…


…and pour it into a mixing bowl.
Then we’ll add in some cold milk…

…and lower in a hand mixer (or you can use a stand mixer but I find this step more convenient to hand mix right in the mixing bowl I can just pop in the fridge in a bit).

Beat together for a few.

Next, we’ll add in a packet of Vanilla Jell-O Instant Pudding (make sure it’s Instant!)…

…and beat it again with the hand mixer…

…until nice and combined.

Now pop a lid on it and let it set in the fridge for a solid 4 hours (or overnight). It MUST firm up before we can continue.

Just before removing the pudding mixture from the fridge, it’s time to make some whipped cream! Pour some heavy cream (or heavy whipping cream) into a stand mixer (or you can use the hand mixer again).

And lower in the whisk attachment.

Beat for a solid 2 minutes on the 6-8 speed until that heavy cream becomes whipped cream!

Now remove the pudding mixture from the fridge. It will have totally firmed up by now.

Then, in a few batches, take the whipped cream…

…and fold it into the set pudding mixture.

When all the whipped cream is added and blended into the pudding mixture, it will be nice creamy! Set that aside a moment.

Now take a bunch of bananas that are ripened just like so…

…and then peel & slice them up. Since bananas turn brown easily once they are peeled and in contact with air, give them a nice rinse to preserve their state (you can use lemon juice too, but I find that screws with the flavor of the bananas too much).

Now take a lovely trifle bowl (this one is transportable and comes with a lid!)…

…and grab this key ingredient: Nilla Wafers!

Layer the wafers into the bottom of the trifle bowl (it’s okay if they slightly overlap – just make sure it’s all covered)…

…and then follow it up with some bananas…

…and then top it off with a layer of that pudding.

So it looks like this when done!

Repeat this 4 times so you have 4 layers (so eyeball the pudding well to make sure you have enough spaced out for each layer)…

…and then top off with a final layer of pudding.

Make sure you leave a little space for the lid to go on top.

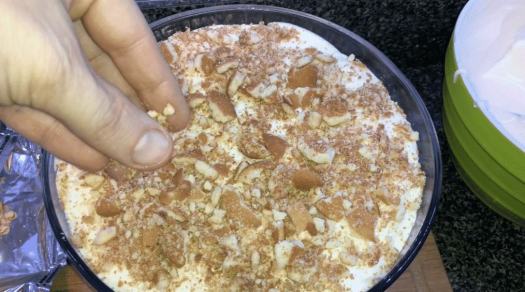
Now, take the remaining wafers and give them a good pounding…

…so that they’re nice and broken up.

Take the cracked wafer crumbles and sprinkle it on the top (you can also do this step right before serving if you want them to taste crunchier)…

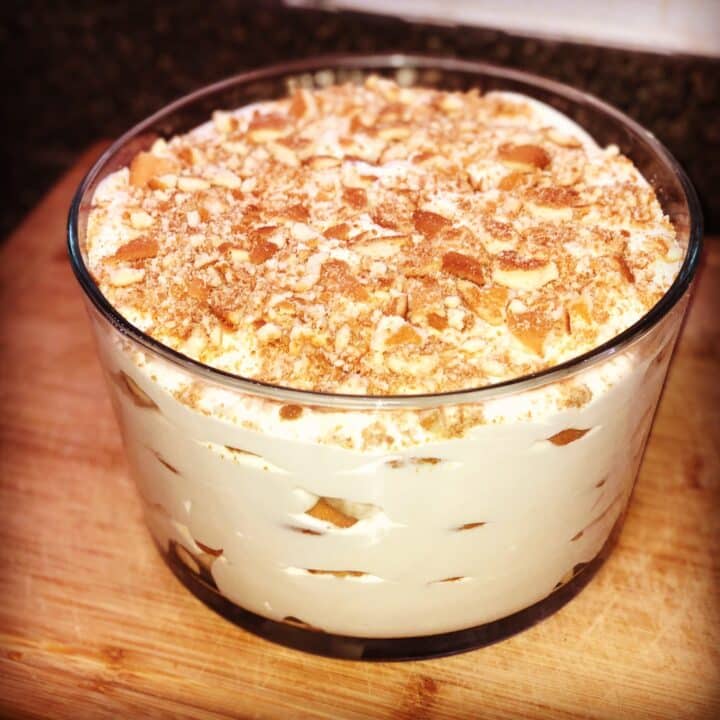
…then place the lid on the bowl and pop it into the fridge for another 4-10 hours. During this time, the pudding will firm lightly and the wafers will absorb some of the pudding, soften up and become cake-like!

When ready to serve, it’s going to look pretty stunning (the trifle bowl really makes a presentation different here!)

Now you can put it on the Viennese dessert table…

…and watch all the lovely people flock to it like it’s a free sample of chicken nuggets at Costco.

But be prepared – as you enjoy your own creation, one of the bubbies may wander over to you…

…and let you know how much they loved it by describing it as “banana pillows in your mouth!”
A REAL TREAT ALL AROUND! Enjoy!
Best Banana Pudding

One of the greatest desserts known to humans and monkeys alike, this here Banana Pudding requires zero baking and will be the be-all end-all to any competitors.
Ingredients
- 14 oz can of sweetened condensed milk
- 1 1/2 cups of cold milk
- 3.4 oz box of Jell-O Vanilla Instant Pudding mix (make sure it’s Instant!)
- 3 cups of heavy or whipping cream
- 6 ripe bananas (about 4 cups worth), sliced into discs and rinsed with water to slow down the natural browning of the bananas
- 11 oz box of Nilla Wafers (NOTE: Along with the Nilla Wafers, you can also totally use Lorna Doones, Chessmen, Nutter Butters and/or pound cake as well for an extra wow!)
Instructions
- In a large mixing bowl, add the condensed milk and the cold milk. Beat for 1 minute with a hand mixer. Then, add in the vanilla instant pudding mix and blend for another minute. Put a lid or foil over the mixing bowl and pop in the fridge to completely cool, set and firm-up for 4 hours minimum (or you can let it rest overnight like I did – but it must set for 4 hours minimum for the proper results so be patient!)
- Just before removing the pudding mixture from the fridge, in a separate mixing bowl, take the hand mixer or a stand mixer and add in the heavy/whipping cream. Beat until it begins to stiffen and look like whipped cream for about 2-3 minutes (I used a stand mixer and worked my way up to the 6-speed and then to the 8-speed). Now take the pudding mixture out of the fridge and transfer the whipped cream into the pudding bowl, folding and mixing in well until smooth and creamy
- Take a trifle bowl and cover the bottom with a layer of the cookies, followed by some of the bananas and then top off with some of the pudding mixture. I was able to get four layers in my bowl so just eyeball the proper amount for each layer leaving a little room for the lid to go on top. Just be careful when layering as part of the experience here is visual (hence the glass trifle bowl) – if you get some pudding or banana remnants on the sides of the bowl prematurely, just wipe it with a paper towel. Once the final layer of pudding is in place (you may have some extra pudding which you can just save for later), crush the remaining cookies and sprinkle on top (you can also sprinkle the crushed wafers on top right before serving if you wish for them to be crunchy).
- Cover the bowl with a lid and pop in the fridge for another 4-24 hours but try not to surpass 24 hours or the bananas will want to turn brown which is totally fine in flavor, but it won’t look as pretty. Again, it must set for at least 4 hours for the wafers to soften so patience is key…and well worth the wait! The longer it’s in the fridge, the more cake-like the wafers will become
- Serve it right out of the trifle bowl and enjoy!
Jeffrey's Tips
You’ll want to use this glass trifle bowl if you wish to transport it as it comes with a lid AND easily fits in the fridge and it fits 3 quarts. OR you can use a larger trifle bowl that has a stand and holds 4 quarts.
If you want crunchier wafers for the final topping, add them JUST before serving rather than before covering the bowl and placing in the fridge for the final 4-10 hours of setting prior to serving.
Like many peeled fruits, the bananas are going to want to turn brown pretty quickly as it is their nature once they are peeled and exposed to air. You can help preserve their color by rinsing them with water once sliced or sprinkling on some lemon juice (but I find the lemon juice changes the flavor and prefer rinsing it).
To that point above, I suggest assembling this no more than 8 hours before you serve it as it shouldn’t sit in the fridge longer than that or the bananas will really begin to brown after that.


Laura
Jeffrey, can you use defrosted whip cream?
Jeffrey
I wouldn’t. Def whip heavy cream into whipped cream!
Alene
Have made this recipe for years. My family’s favorite!
Krissi
Best banana pudding ever, so creamy!!
Katie
So good and easy to make.
Paul
Any suggestion on a non dairy option (oak, pea milk)?
Tracey L Langston
Can you use banana pudding rather than vanilla & has anyone had it like that?
Lisa
I’m not a fan of the artificial flavor of the banana pudding. I found that the vanilla works best.
L
What does this have to do with pressure cooking? I ask because this is how I already make banana pudding (accept I add cream cheese with the condensed milk), but my southern husband always asks for it warm. I don’t know how to do that, as I am not from the south, I just live here now and I taught myself how to make it from Paula Dean’s recipe lol! I have a ninja Foodi cooker and was looking for a recipe to use the cooker with so my husband could scoop up (I guess warm pudding) before it goes to chill, which I think sounds disgusting but it’s what he grew up with. This title was a bit deceiving lol
Trey
Not sure if you found a solution or not. What your husband had sounds like what my mother used to make. She used a pie plate lined on bottom and sides with Nilla wafers, topped with sliced bananas. She would then make the heat and serve vanilla or banana pudding on the stovetop. Once thickened, pour over the banana slices. Then smooth and top with more Nilla wafers. I enjoyed it warm but it was also great once chilled.
Farmersdaughter
Your husband is actually asking for the banana pudding with homemade vanilla pudding that is cooked on top of the stove. That’s how I learned to make it from my mom and grandma, both from the south. But instead of chilling it, he likes it warm. You can accomplish the same thing using the packaged pudding pie filling you cook on the stove and serving it warm.
Lisa
Dipping your bananas in pineapple juice will keep them from turning brown. However, do not leave them in it long as they will “melt”.
Genny
I basically make this, but mine has a block of cream cheese in it also.
Tamie Hickey
I dip my sliced banana in lemon lime soda to slow the browning process.
Jen
I LOVE this recipe! Had anyone ever substituted strawberries?
Heather
I haven’t tried that, but it sounds delicious!!!